
GrabScanGo Pay Terminal Setup Instructions
1. Assemble Terminal
Below is a short video that describes how to assemble the terminal.
2. Configure Terminal (Preferably done at operator’s office, at least 48 hours prior to market opening)
- Send email to [email protected] with the following info:
- Operator name
- Market Location name
- Photo of serial number label on the back of the device; Label will contain 1 letter followed by 9 numbers – e.g. A193019755
- Connect device to AC power, and allow it to boot up – usually takes 1-2 minutes
- Press both buttons on rear of device simultaneously so password popup is displayed on screen
- Enter password*: 1elo
- Click “Apps” in bottom menu
- Click “Settings”
- Click “Network & Internet”
- Set up Internet connection:
- If using WiFi:
- Click “WLAN”
- Turn it ON
- Select WiFi network
- Enter WiFi network’s password
- If using Ethernet:
- Click “Ethernet”
- Turn it ON
- Plug Ethernet cable into port on rear of device
- If using WiFi:
- AveriGo support personnel will configure & update device
- AveriGo support personnel will install GrabScanGo pay terminal app on device
- Allow app to turn on Bluetooth when prompted
- Allow access to Location Services when prompted
- Log into GrabScanGo pay terminal app using your pay-terminal-specific account – contact [email protected] if you do not have an account
- Click “OK” on usage stats permission popup
- Click on “GrabScanGo” entry & then turn switch OFF & back ON
- Plug beacon, provided by AveriGo for the respective market, into wall outlet – associated market should now be displayed on the screen
- Click “Click to Start Scanning”
- Scan below “QR Codes OFF” barcode (scanner will emit short beep if barcode is successfully scanned) – this disables scanner from scanning QR codes
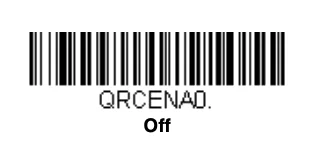
* After device is configured by AveriGo personnel, its password changes to 9n60rk (not 1elo anymore)
3. Install Terminal at Market Location, and Test Purchase Flow
- Connect device to AC power, and allow it to boot up – usually takes 1-2 minutes
- Press both buttons on rear of device simultaneously so password popup is displayed on screen
- Enter password*: 9n60rk
- Click “Apps” in bottom menu
- Click “Settings”
- Click “Network & Internet”
- Set up Internet connection (if WTI cellular router is being used at location, see installation instructions below):
- If using Ethernet (Preferred; Provides a better user experience):
- Click “Ethernet”
- Turn it ON
- Plug Ethernet cable into port on rear of device
- Turn WiFi OFF:
- Click “WLAN”
- Turn it OFF
- If location has a firewall, or will only provide a static IP address, see additional Internet setup instructions below
- If using WiFi (Use only if Ethernet is not available; Poor WiFi will adversely affect user experience):
- Click “WLAN”
- Turn it ON
- Select WiFi network
- Enter WiFi network’s password
- If using Ethernet (Preferred; Provides a better user experience):
- Plug beacon into wall outlet – associated market should now be displayed on the screen
- Click “Click to Start Scanning”
- Scan 1 or 2 products
- Check out & pay
* After device is configured by AveriGo personnel, its password changes to 9n60rk (not 1elo anymore)
Additional Internet Setup Instructions
- If location has a firewall, request location’s IT department to allow access to the following URLs & ports:
- https://api.averigo.com; Port 443
- https://payments.averigo.com; Port 443
- https://analytics.averigo.com; Port 443
- https://eloview.com; Port 443
- If location only provides a static IP address:
- Request the following info from location’s IT department:
- IP address
- Subnet mask
- Gateway address
- After info is received, configure device:
- Press both buttons on rear of device simultaneously so password popup is displayed on screen
- Enter password: 9n60rk
- Click “Apps” in bottom menu
- Click “Settings”
- Click “Network & Internet”
- Click “Ethernet”
- Click “Ethernet Configuration”
- Enter IP address, Netmask (Subnet mask) & Gateway address provided by location’s IT department
- Enter 8.8.8.8 for DNS1 address, and 8.8.4.4 for DNS2 address
- Click “CONFIRM”
- Request the following info from location’s IT department:
WTI Cellular Router Installation Instructions
- Connect both 4G LTE antennas, one to the “Main” port and the other to the “Aux” port, on the front of the router. Always use both antennas provided.
- Connect WiFi antenna to the “WiFi” port
- Connect the Ethernet cable to the “LAN” port on the back of the router. Then connect the other end of the Ethernet cable to the pay terminal you are connecting to the router.
- Power on the device by connecting the male end of the power cord to the port labeled “PWR” on the back on the router.
- After a few minutes, the router will download the GrabScanGo configuration, and the WiFi hotspot “gsgprivate” will become active – connect second pay terminal to this WiFi hotspot
WTI Router Specifications
- Cellular (WAN) Connections
- Dual SIM – Verizon, AT&T
- Failover Feature:
- Default setting is automatic failover from Verizon to AT&T SIM, if Verizon signal gets weak or unstable; Resets every night back to Verizon
- If AT&T signal is stronger or more stable at location, router can be configured for automatic failover from AT&T to Verizon – contact [email protected] to change configuration
- LAN Connections
- 2 Ethernet ports
- WiFi (connect WiFi antenna):
- SSID: gsgprivate
- Password (Do not share): Gr@65c@nG0 (last digit is a zero)
- Whenever possible, use Ethernet for main pay terminal & WiFi for front desk pay terminal